
When you generate a Customer Invoice for a load, you can attach additional documents to be included in the Customer Invoice PDF. Before creating the Customer Invoice, upload all documents you would like to include in the invoice into the Load profile, and confirm that the Customer has those Invoice Doc Types selected in their Customer Profile.
Below you can find a walkthrough describing how to upload documents before invoicing a Customer.
1. Uploading to the Documents Section of a Load
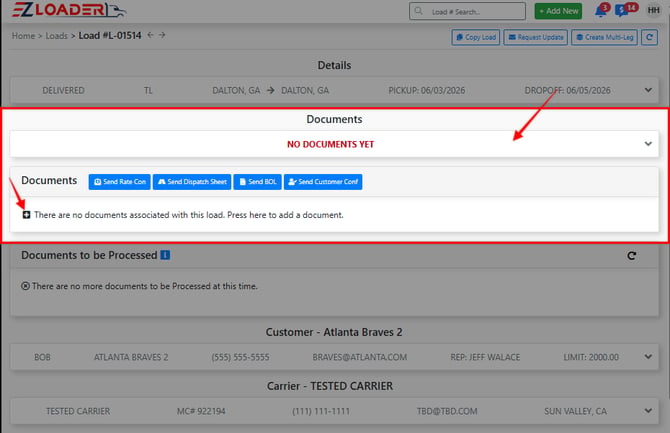
- Inside the load profile, Click on the Documents section
- Click the [+] button to upload a new document
- Select the Document type you would like to upload
- Select the document you would like to upload or Drag & Drop the document into the upload box
- Select All POD uploaded unless the load is a multi-stop load and you are expecting to receive another POD for the additional stop(s)
- EZ TMS will automatically update the status or the load when a POD is added into the documents section (ex: Delivered > Inv Audit) unless the "Change Status" box is deselected.
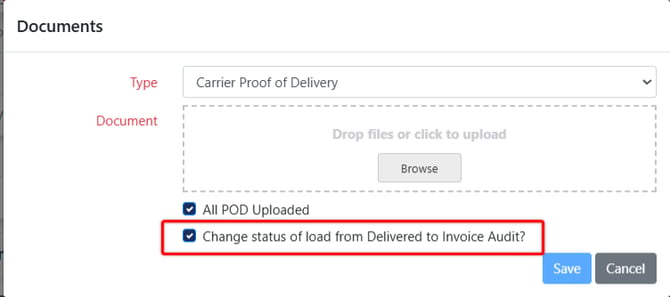
- Once the Document is Added, Click [Save] and you will notice the status of the load update with this action
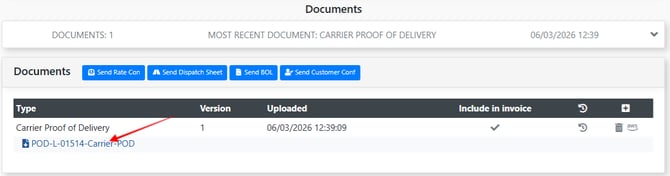
- Click on the blue link to view the newly uploaded POD
2. Uploading a Carrier Invoice into the Documents Section of the Load
After passing the load through the Invoice Audit and into Received status, you will can repeat the steps above to upload a carrier invoice document.
***NOTE - You must also enter the Carrier Invoice # and the Invoice Received Date into the Load Profile by opening up the Accounting section of the Load Profile.
- Click the Edit Icon to open up the Carrier Card located under the Accounting section
- Enter the Carrier Invoice #. As a best practice, we recommend entering the EZ Loader Load # first, followed by the Carrier's actual Invoice #
- Enter the date you Received the Invoice OR the actual Invoice date, whatever you prefer.
- The Due Date will populate based on the Carrier's Pay Days that can be set within the Accounting Details section of the Carrier profile.
- ***NOTE - If QuickPay is selected, you will be prompted to chose a QuickPay option
- Click [Save]
In Summary
Proof of Delivery - Uploading a POD document will prompt a user to change the status to Received.
- Changing a load to Received status will move the load into the Invoicing page and it will be ready to invoice.
- You can also manually move a load to Received status by going into the load profile Details > Status > Click the edit Icon > change the Status to Received
Carrier Invoice - Uploading a Carrier Invoice in a load will also change the status to Received.
- If you utilize EZ TMS Quickbooks Sync, entering the Carrier Invoice # and Invoice Received Date will trigger a Carrier Invoice to sync and generate a Vendor Invoice in Quickbooks.
Click Here for More regarding EZ TMS Quickbooks sync for Carrier Bills