Below you'll find walkthroughs describing how to create an invoice for an individual load and how to create a Batch invoice containing multiple loads.
1. Invoicing Section Overview
- The Invoicing Page can be accessed in the lefthand sidebar under the Accounting tab
- The Customer Invoices Manual section displays your list of Customers and the corresponding loads of each Customer that are currently in Received status.
*** NOTE: A load profile will only appear in the Invoicing section when the load is in Received or TONU status ***
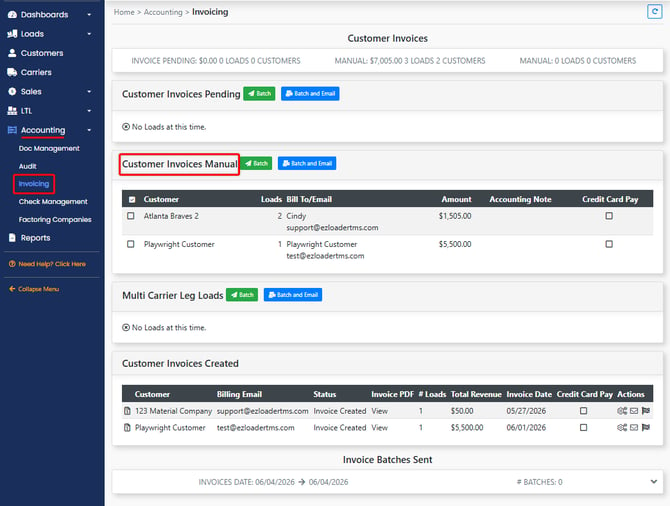
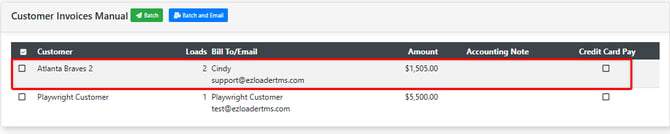
- In the image below, the Customer Atlanta Braves 2 has two loads that are in the queue waiting for Invoices to be created by you.
2. Creating an Invoice Batch
-
Click the number in the Loads column to pull up the Load Detail.
- The Load Detail displays the Load profiles that are currently in the queue to have customer invoices generated into a PDF. Notice the status column displays the load in Received status.
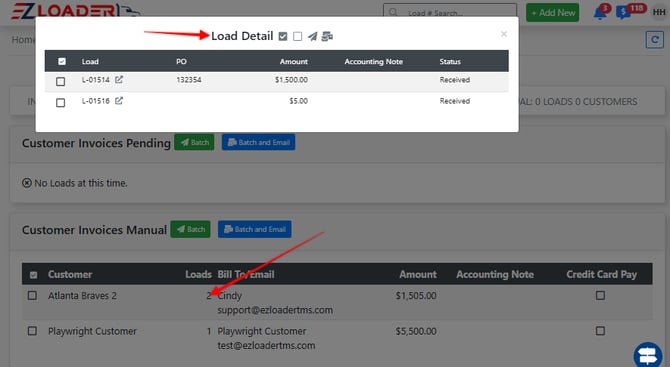
- To batch one load, click the checkbox beside the load number in the Load Detail to select it. To combine multiple loads into one single batch invoice, click all the loads you would like to include in the batch.
- Click the paper airplane icon [
 ] to batch the selected load(s), triggering EZ TMS to create an Invoice PDF file.
*** NOTE: By clicking the paper airplane icon, you are also changing the status of the load from Received to Invoiced. ***
3. Customer Invoices Created
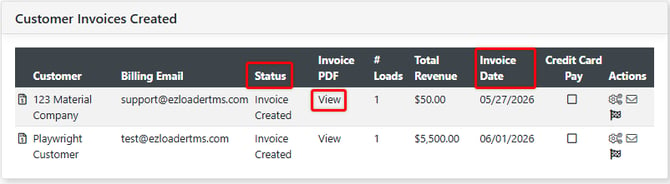
- The Customer Invoice Created section displays your list of Customers and the corresponding loads of each Customer that are currently being created into Invoice PDF files that you'll be able to review.
- The status column will display Waiting to Process while the Invoices are being generated. By clicking the refresh icon at the top of the page after a few seconds, you should see that the status has change to Invoice Created.
*** NOTE: EZ TMS generates Invoice PDF's every 90 seconds in real time. By clicking the refresh icon at the top of the page, your invoice should be generated within a 90 second window ***
-
Click the number in the Loads column to pull up the Load Detail, enables you to view each individual load invoice that was created within the invoice batch.
- The Status column will display Invoice Created when the Invoice has been generated.
- Click the "View" link to preview your invoice in another browser tab. You can also download a copy of your Invoice here. The first page will contain the Customer invoice. If you have selected Invoice Document Types within the Customer profile, any document that was uploaded into the load profile that is labeled as an Invoice Document Type will also be included in the PDF. (Examples: Proof of Delivery, Weigh & Inspection Certificate, etc).
- The Customer Invoice Date has been generated inside the load profile.
*** NOTE: If you are utilizing EZ TMS's Quickbooks Online integration or Quickbooks Desktop integration, the creation of the Customer Invoice Date triggers EZ TMS to sync and create a Customer invoice in Quickbooks Desktop or Quickbooks Online account. ***
Click Here for more on EZ TMS Quickbooks Customer Invoice Sync
3. Customer Invoice Actions
- Regenerate Invoice: Click to recreate your Invoice PDF document. You might need to regenerate your invoice if you realize that the invoice is incorrect, or you have forgotten to upload an Invoice Document Type into the Load profile that needs to be included in the Invoice PDF. After you have made a change to the load, clicking this icon will recreate the Invoice PDF document.
- E-mail: Click to display the EZ TMS E-mail send window to send your Invoice PDF out of the system to your recipient.
- Mark Sent: Click if you do not want to e-mail the Invoice out of EZ TMS and you simply want to move this Customer Invoice batch to the next section below: Invoice Batches Sent.

4. Invoice Batches Sent section Overview
-
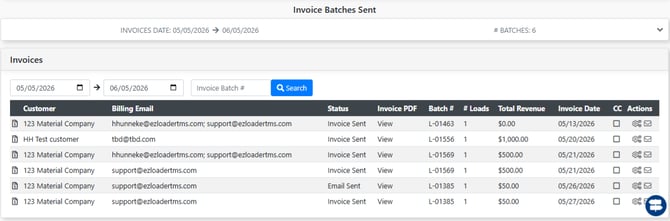
The Invoice Batches Sent section displays your list of Customers and the corresponding loads of each Customer that have either been e-mailed out of EZ TMS to your Customer or marked sent by clicking the checkered flag in the Customer Invoices Created section above.
-
Filter your Customer Invoices by Invoice Date by using the Date filters.
- Click the "View" link to review your invoice in another browser tab. You can also download a copy of your Invoice here.
- Click the number in the Loads column to pull up the Load Detail, enabling you to view each individual load invoice that was created within the invoice batch.
- Regenerate Invoice: Click to recreate your Invoice PDF document. You might need to regenerate your invoice if you realize that the invoice is incorrect, or you have forgotten to upload an Invoice Document Type into the Load profile that needs to be included in the Invoice PDF. After you have made a change to the load, clicking this icon will recreate the Invoice PDF document, sending it back into the Customer Invoices Created section.
- E-mail: Click to display the EZ TMS E-mail send window to re-send your Invoice PDF out of EZ TMS to your recipient.