
***NOTE - If you do not have any Customers set up within your account, please Click Here to review how to create a Customer.
Building a load from Scratch
Step 1
Click on the Green [+ Add New] Command Center button > Select New Load > enter the Customer Name
This will take you to a page where you enter the basic Load Details (Truckload or LTL, trailer type, etc.) and the Customer Rate.
Note: All fields with an * are required fields
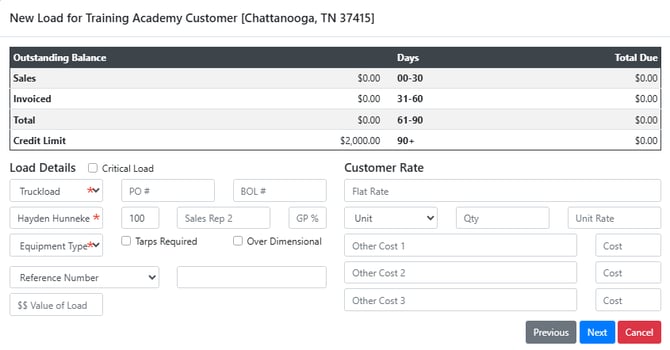
On page 1 of the New Load Wizard you will see:
Outstanding balances and the AR Aging report for the customer. This will give you a quick overview of the health of your customer's account.
Fields to input Mode, Sales Rep 1 & 2 with GP%, Reference Numbers, Equipment Types, Value, etc.
The "Critical Load" checkbox will make the load appear in red font within your Loads List when selected.
The customer rate is what you will be charging your customer. You have the option to input either a Flat Rate or a Unit Rate (Qty * Unit Rate = Total Rate to Customer)
Step 2 – Lane & Item Details
Page 2 includes the details for the lane as well as the items on the load.
If you need to build a Multi-Stop Load just click the [Add Stop] button in the Origin header
If you need to add an Item to a shipment click on the blue [Add Pickup Item] button in the Item header
When entering information into the "Name" or "Product" field, any locations or items that were saved in the customers profile will display.
If you would like to save the location to the customer profile for later use, mark the “Save Location” box
If you would like to save the item to the customer profile for later use, mark the “Save Item” box.
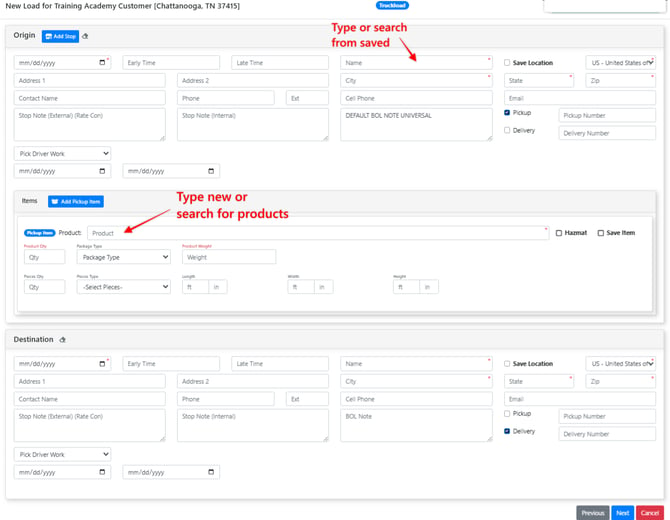
Stop Notes & BOL Notes - Information entered into these sections will show up on the Rate Confirmation (Stop Note) and the BOL (BOL Note). You can also set default notes for the customer in the Customer Profile 'Notes' section.
Step 3 – Assign Carrier & Send Carrier Rate
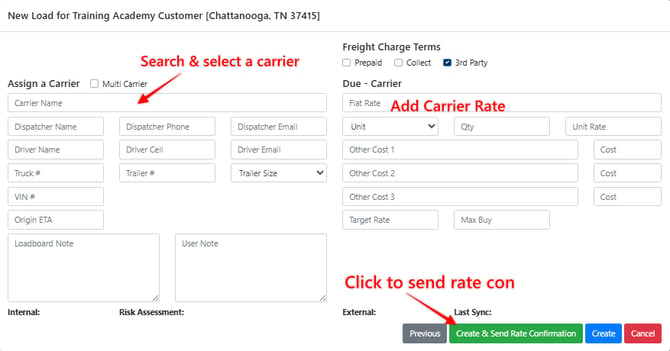
Page 3 gives you a few options:
- Assign Carrier and send Carrier Rate Confirmation
- Create the load profile without assigning a Carrier
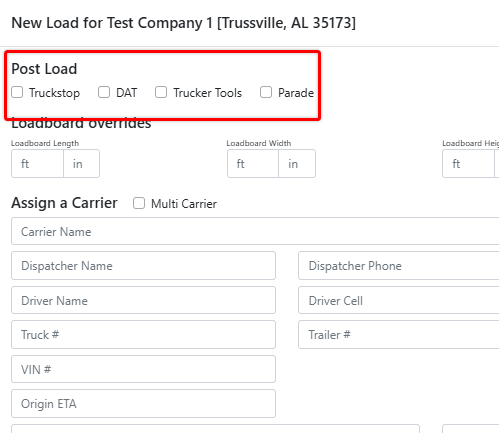
- Posting the load to the load-board (Only available with active Loadboard Integration)
Option 1 - Assign Carrier and send Carrier Rate Confirmation
Step 1: Start typing in the carries name into the "Carrier Name" Field. You will see a list of search results from your list of Active carriers appear below the field. Carriers in the list will be color coded to show if they are available for assignment.
- Red - Unacceptable Risk Rating or No Insurance / Expired Insurance
- Yellow - Moderate Risk Assessment, Carrier Flagged or No Carrier Agreement on File
- Green - Good to Go
Click Here for Article on Carrier Profile Requirements
Step 2: Input dispatcher contact info and Carrier Rate
Step 3: Select [Create & Send Rate Confirmation], This will send the rate confirmation to the dispatcher contact info entered and build the load profile with a status = "Assigned"
(Note: You may also assign the carrier and select the blue [Create] button to create the load without sending the rate confirmation. The rate confirmation can be sent from the load profile at a later time)
Option 2 - Create the Load Profile without Assigning a Carrier.
You may select the blue [Create] button without entering any carrier information. This will create the load profile with a status = "Available"
You may enter the load profile and assign a carrier / send a carrier rate con at a later time. Whenever you add a carrier to an available load the status will automatically change from "Available" to "Assigned"
Option 3 - Posting the load to the load-board
*Note This is only applicable if you have a Load Board integration such as DAT or Truckstop*
On page 3 of the New Load Wizard you also have the option to post the details of the load out to a load board.
Utilizing the Copy Load Function
When you need to create multiple loads that will run the same lane, or build several loads for the same customer, you can work more efficiently by using the [Copy Load] function which can be found in the load profile of a load you want to copy.
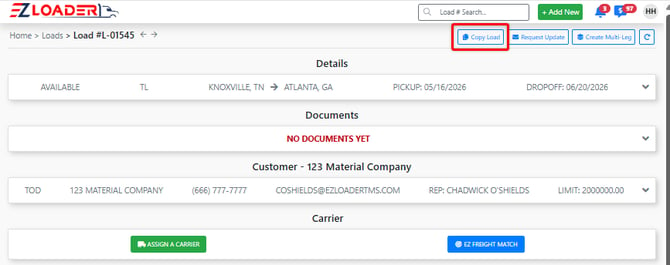
After selecting [Copy Load], Chose the sections that you would like to copy from the menu and how many copies you intend to generate.
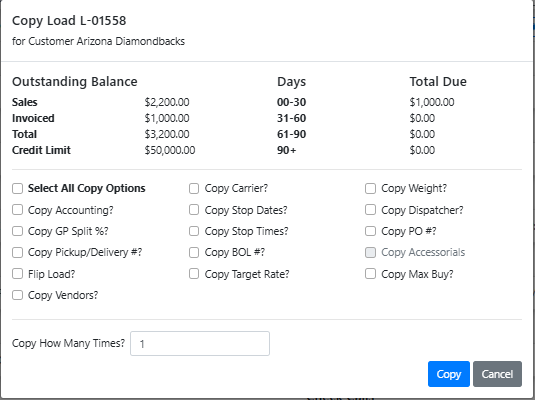
Click Here to View Copy Load Article